How To Use The Revo Decocking Tool
How to Use the REVO Decocking Tool — A Clear, Practical Guide
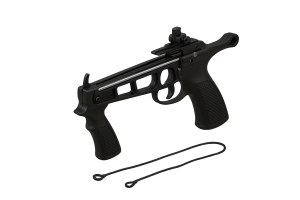
Quick summary: The REVO decocking tool is a small grey insert stored in the grip. To decock safely you need the safety pushed forward, the cocking handle pulled almost to the forward position (not all the way), and the bow flipped so you can press the internal red latch with the decocking tool. Follow the steps below, move deliberately, and keep the bolt path clear.
Before you start: important safety checks
-
Treat the crossbow as loaded until you have verified it is not. Always point it in a safe direction.
-
Remove any bolts or magazines and keep fingers well clear of the trigger and string path.
-
Wear eye protection if available.
-
If you are unsure at any point, stop and seek assistance from someone experienced. These parts are under tension.
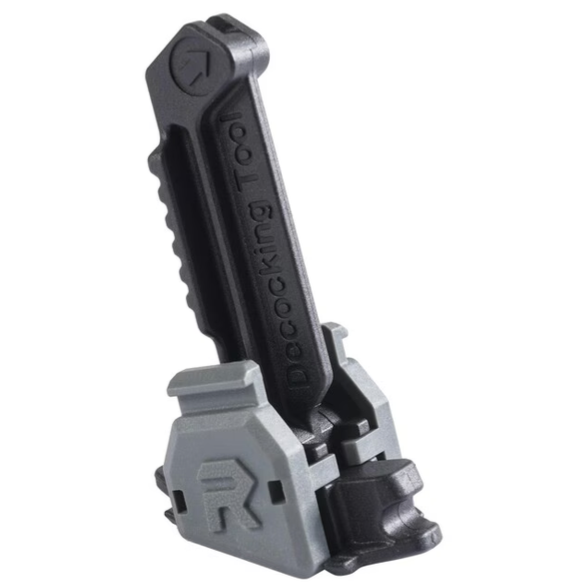
What the decocking tool is and where it lives
The decocking tool is a small grey piece designed to be stored inside the grip of the REVO. It is used to press a small internal red latch beneath the main body to release the string catch during decocking.
Step-by-step decocking procedure
-
Clear the rail and remove the magazine or bolts. Make sure nothing is in the bolt path. If the top rail or magazine is not fitted, fit them because the safety may not behave correctly without the top assembly.
-
Pull the decocking tool from the grip and keep it handy.
-
Push the safety forward to the red (Fire) position. This is necessary to expose the internal mechanism.
-
Flip the bow upside down so you can access the underside of the main body where the latch sits.
-
Bring the cocking handle almost all the way forward, but not fully. There is a specific “almost forward” position that exposes the latch. If the handle is fully forward, some safeties will reset and the latch will not engage.
-
Use the decocking tool to press the internal red latch underneath the body. Press firmly and steadily. You should feel or hear a click as the string catch releases.
-
Confirm the string has released and is safe. Visually check and gently lower any moving parts back to their resting positions. Refit the magazine only after the string is secure and the rail is clear.
Troubleshooting: common issues and fixes
-
Can’t find the red latch: Verify the safety is in the red (Fire) position and the cocking handle is only almost forward, not fully. Flip the bow over and look along the underside near the cocking handle area.
-
Safety returns to green and latch won’t click: You probably pulled the cocking handle fully forward. Pull it back a little to the almost-forward position and try again.
-
Decocking tool is in the grip but you don’t know where to press: The tool is used to press a small red latch under the main body near the cocking area. Work slowly and feel for the mechanism while following the steps above.
-
Top rail not fitted and safety won’t engage: Fit the top rail or assembly because the mechanism often only decocks correctly with the rail in place.
Practical tips
-
Move deliberately. Rushing raises the risk of accidental dry fire or pinching.
-
Keep the decocking tool stored in the grip when not in use so it is always available.
-
If anything feels stuck or the mechanism behaves unexpectedly, stop and get help. A short video for someone experienced to check is often quicker than guessing.
-
When practising the procedure for the first time, do it slowly without a bolt fitted so you can become familiar with the positions and feel of the mechanism.
Quick checklist
-
Rail clear and no bolt fitted
-
Magazine removed
-
Decocking tool removed from grip and ready
-
Safety pushed to red (Fire) position
-
Bow flipped upside down for access
-
Cocking handle pulled almost forward (not fully)
-
Press internal red latch with decocking tool until click
-
Confirm string released and safe